One of the biggest names in the gaming community Steam is home to many great online multiplayer games. As a gamer, it’s quite common you have steam in your system and you enjoy the games it provides. Be it CS: GO or Dota 2 or any other game in its stock. Although, one of the most common questions among gamers around the world and the steam community is where are Steam screenshots are saved.
As a gamer, the screenshots of your triumphs are like a treasure to you. And steam has a cloud capacity of 1 GB, dedicated just for your special memories. But while it is easier to take screenshots, accessing them is another story.
Today we compiled a list of solutions and FAQ on where do Steam screenshots go and we are pretty confident that after reading this article you will never run into the same problem and moreover treasure your Glorified moments. So without any further adieu let’s dive in.
Where do Steam Screenshots Go?
Steam screenshots always get stored in Steam client. Furthermore, it is programmed to get stored in the Steam folder on the drive, where you installed steam.
Where Are Steam Screenshots Saved? Here’s the Answer!
Method 1. Use Steam client
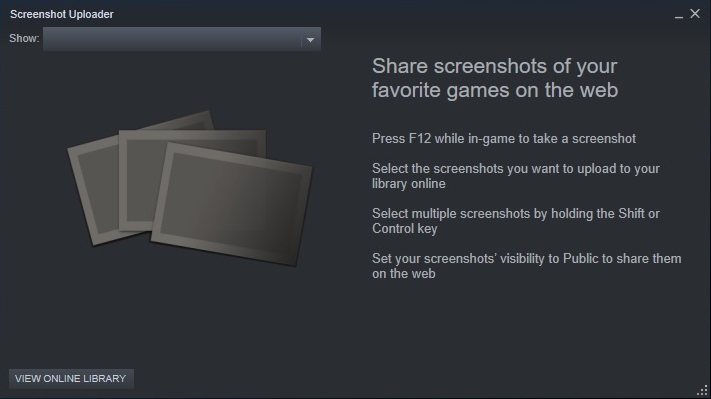
The first method on our list is Using the steam client. Not many people know, but there is a folder called steam’s Screenshots folder. Now as the name suggests, it is a folder that stores the screenshots you have taken since you have first used steam.

Furthermore, it can be filtered and catalogued really well just like a folder, making it easy to find a specific screenshot. These screenshots can be viewed or discovered using screenshot manager, over the menu bar, and under the view option. Below are the steps to get access instantly.
- Go to steam’s Menu Bar and open the ‘View’ option.
- Select ‘Screenshots’ from the Drop-down Menu.
- Next, you will see a new section open where you will find your screenshots displayed. If they are ever taken.
- Once the screenshots have been located, Steam gives you the option to choose what you want to do with those screenshots.
- Next select ‘disk on show’ to open the system’s file explorer in the directory and get access to the specific location where the screenshot is stored. Now you can easily discover the screenshot you are looking for.
- You can now easily move or upload any screenshots to other files or folders with ease.
Method 2. Locating Steam’s Screenshots folder using Windows
Next up, we would suggest trying to locate Steam’s Screenshots folder using Windows. Every steam user has their own screenshots folder, where all their in-game screenshots are saved. Likewise, this particular folder can be found in that drive where your steam app is located. Which is usually Local disk C. Subsequently, here is how you find it.
- Go to your PC and open C drive.
- Next under program files select the steam folder.
- Now for quick access copy and paste ‘C:\Program Files(x86)\Steam’.
Once the steam directory has been found, follow these steps:
- Find ‘user data’ and open it.
- Open userID or accountID folder.
- Look for the folder named 760 and select ‘remote’.
- You will see a folder of different games you have played.
- Now looks for the GameID, whose game’s screenshot you are looking for
here (https://steamdb.info/apps/). - Once, you have discovered your Gamer’s ID, come back to REMOTE and open a folder with Gamer’s ID.
- Lastly, once it’s opened, go to the folder named ‘SCREENSHOTS’. This folder should contain all the screenshots you have been looking for.
Method 3. Accessing Steam Screenshots using MacOS
After that, we have the solution for Mac users. If you are a Mac user and looking for ways to access your Steam Screenshots through the Steam Application itself. Here is how you do it.
- Upon the menu bar, click on ‘view’.
- Under the view dropdown list, select ‘Screenshot’.
- Now, under the screenshot section, it should show if you have taken any screenshots or not, provided you have taken any screenshots using Steam’s built-in screenshot tools over here.
- Then select the ‘show on disk’ option from the screenshot section, and by now an external screenshots folder should be open.
- This particular screenshot folder is the folder that stores Captured Screenshots.
Let’s say, you have failed to locate or unsuccessful in finding any folder under built-in-client over steam apps. Worry not, there is an alternative way. In order to locate Steam Screenshots locally, you have to know the right path for locating Steam Screenshots on mac. And here is how you do it:
- Firstly, open library.
- Go to application Support.
- Look for the STEAM folder.
- Select and open the Steam folder and then look for ‘user data’.
- If you have multiple mac users, you should look under the right username.
- Then search for Steam Screenshots under the correct username.
- Once the desired username is selected, search for ‘screenshots’.
- Finally, the screenshot folder should have all screenshots you have been looking for.
Method 4: Accessing Steam Screenshots for Linux users
For Linux which is quite common, we suggest you follow up on these steps:
- Locate Userdata folder.
- Now, you get an option of either navigating to the screenshot folder or making a search for the Steam screenshot folder.
- Finally, after you have located the Steam Screenshot folder. Open it and you will find all your treasured screenshots over here.
Related Article: Top 15 Games like Skyrim You can Play in 2020
FAQ’s
We would answer some common FAQs people have, that might help in finding where are steam screenshots saved.
Q1. How to save or take Screenshots with Steam?

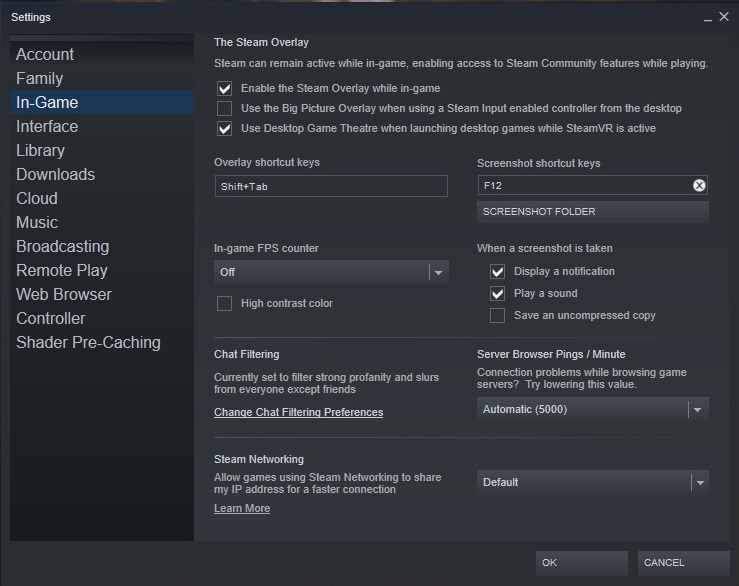
In order to capture a screenshot, you have to press the F12 key. It so happens, that once you press the F12 key the screenshot will automatically be saved on your PC. Alternatively, you can do your own customization by assigning a hotkey. All you need is to visit the In-Game section and under ‘The Steam Overlay’ section look for ‘screenshot shortcut keys’.
Under screenshot keys enter the key name you would like to use for taking screenshots in future and you are good to go. Furthermore, you also get to choose if you want to have a display of a notification using a checkbox.
Q2. Is there any way to change the steam screenshot folder location?
Absolutely, steam lets you allocate a new path to the screenshots you are going to take.
And this is how you do it.
- Open steam and select ‘View’ over the menu bar.
- By now a new window has opened, and you need to click ‘In-Game’ under options.
- Then you have to look for the ‘Screenshot Folder’ option that’s right below the Screen shortcut key option.
- Now click on ‘Screenshot Folder’ and create a new folder. Then give an address path of where you want the Steam Screenshots to be stored.
- After you have selected a new folder, click on ‘select’ and to finalize the changes, click ‘ok’.
And for Mac users, the process of changing the steam screenshot folder location is the same as above.
Q3. Facing problems opening Steam Overlay?
A problem entirely of its own, fixing steam overlay will require an intermediate process.
Usually, the overlay window can be opened through shortcut keys (Shift + Tab), but it is to be kept in mind. That the overlay is embedded.
Conversely, the overlay is a supporting component of the games you play. There is a good chance of this closing on its own if you have a heavy load coming to your system as you are in the middle of playing games. In this case, you must make sure that the system is not overloaded which might have caused the overlay to not open.

Using the right shortcut keys prevents your system from having a heavy load and here is how you do it.
- Open Steam system client.
- Then go to steam settings and preferences in the tab.
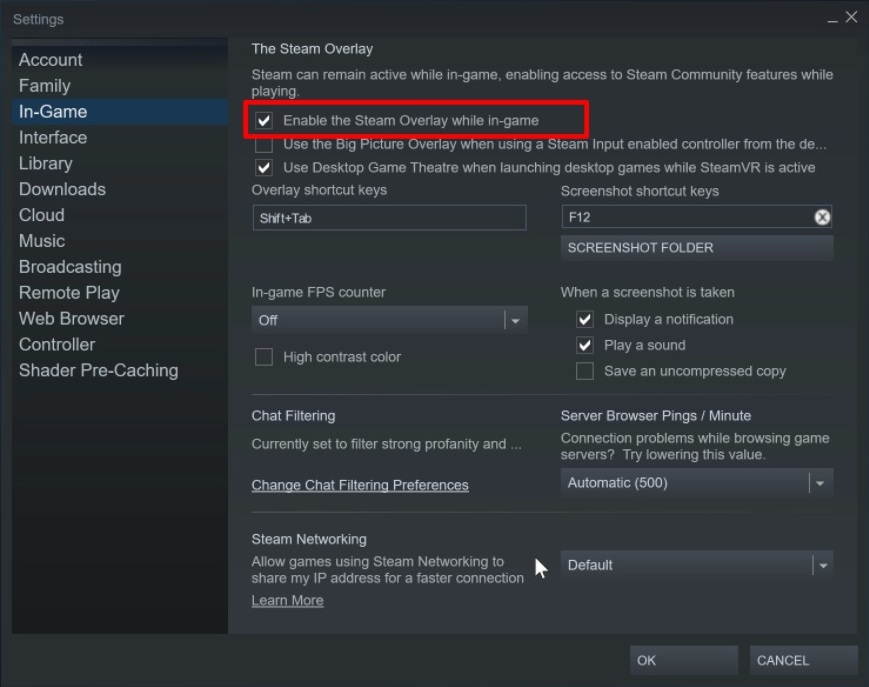
- Next, you will find a checkbox, just next to system overlay while in-game.
- Finally, you have enabled overlay and now you can easily open it.
Alternatively, you can try this process as well (for Windows users):
- Right-click on the game on your computer.
- Select properties under the general tab.
- Next, you will find a checkbox next to ‘system overlay while in-game’.
- Select and close the window.
- By now you should be able to open overlay steam.
Q4. Why are my Steam Screenshots not saved in the desired folder?
Answer. Let’s say you are having the problem with steam screenshots not being saved on the selected folder. Then you might consider looking at your Local disc C drive where it is stored by default.
In this case, you just need to check that whether you have to make sure to tick the checkbox, which is right next to the label ‘save an uncompressed copy’ in the steam screenshot folder location. By applying this you won’t be thinking regarding where are steam screenshots saved.
Wrapping Up
So these were these solutions of Where are Steam Screenshots Saved ?. As a gamer, we know how it feels to get a rampage and how a screenshot helps to woo you in the gaming community. That is why this small problem has gained major attention, and the fix is of utmost importance.
We hope the solutions in this list help you solve this dispute, and you never wonder where are steam screenshots saved. Let us know which solution helped you out, and we have many more articles on other topics so be sure to check them out. Till then Peace.

