Android Studio Tutorial : Android development usage is vital for those who develop apps and Android Studio is perhaps the most powerful option available.
In fact, it is the official IDE (Integrated Development Environment) app created by Google mainly for the Android platform and is perhaps the most used studio app to create the apps that you might be using in your daily routine.
The official version of Android Studio came out in 2014 after many Beta versions since its first announcement by Google at the I/O 2013 conference.
With the release of Android Studio life became easier for app developers as it was the first non-specialist software that had a long way to go. But, as is if you learn the ropes than no work is bigger or hard to learn. In this article, we will present to you a very easy to understand Android Studio Tutorial.
This Android Studio Tutorial for beginners is made for those who do not understand much JAVA or coding. If you are a novice then you definitely have a lot to learn and perhaps you wont finds all the information required on the many official channels available- cause either they are outdated or too complex to make any sense to a novice.
Android Studio Tutorial : Basics
In this article, we shall try to present a simple Android studio tutorial for beginners by providing you details so you can get your work started. The article is in simple English so you should not have any issues in understanding.
What is Android Studio?
If you are a novice to Android Studio and have no knowledge of coding than perhaps you might not know what IDE is as well.
As an IDE or Integrated Development Environment, the job of the Android Studio is to present you an interface on which you can develop your apps and be able to easily handle complex files with ease.
For this, you will use a language known as JAVA, which you will install separately on your computer or device. In simple language, Android Studio is the page where you will write the app and then as per requirement edit and save the changes of your work.
You also get access to the Android SDK (Software Development Kit). This is the extension or JAVA code that will help you in creating your app on any Android device.
JAVA is the language that you will use to write the app and the Android SDK is what helps you to run it. You also are able to run the coding on the emulator or a hardware running on your device.
Over time Google keeps on working to make Android Studio more helpful. You get live coding hints as an example and also suggest vital changes so you solve errors that can be fatal for your app development.
In case a variable is not getting used it will turn grey indicating an issue is at hand. Android Studio also provides suggestions that are complete so you can solve the issue.
This is ideal for those who have issues in remembering the syntax or just prefer saving valuable time.
Android Studio Tutorials :
Android studio tutorial for beginners is for those who do not understand coding or JAVA so lets get to the android studio basics. Here is the Setting up:
Android Studio is very easy to setup as all that you require is packed in one installer. Yes, both Android Studio and SDK in one pack. The JAVA kit will have to be installed separately.
Do remember Android Studio is actually like your Window program so make sure you have enough space on your C:/ drive before you begin installing.
Download Android Studio Installer – Click here
Download JAVA here: Click here
The Android tutorial is very easy and the steps are very simple to understand so just follow them and install. You should be up and run with your Android Studio to develop apps.
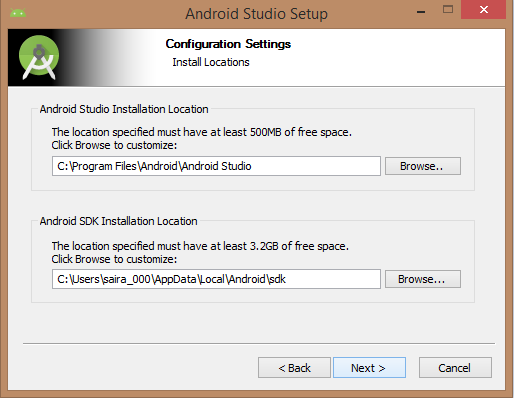
Do remember to check ‘Install SDK‘ checkbox as well and both Android Studio and SDK are used as default. For this, you can see the image below for default settings.
 Make sure the directory you pick for placing the SDK file has no spaces. Also, remember the AppData folder selected by Android Studio is going to be the hidden folder in Windows. So do select Show Hidden Folders so you can use the explorer to the browser.
Start a New Project
Now that your Android Studio is up and running you will want to begin with your first project.
First, launch Android Studio and select New Project (You can also choose a File)> New> New Project. This can be done anytime from the IDE.
Then you can pick the different types of activity you require according to the app you are developing. To be more clear- activities are the different screens your app. will show case.
If you want you can opt for no activity and for this you will have to choose to Add No Activity but, as is you will want to add at least one activity as it is better to work with at least something rather than a blank app template.
After understanding this android studio tutorial you should be able to setup your Android Studio and have your business bagging clients. Though Android Studio is [perhaps the best choice, still below are some of the other IDEs available.
Other Popular IDEs
#1 IntelliJ
IntelliJ IDEA is an intuitive and smart UI. The interface comes with some customizations like Dracula theme as well. Yes, it is quite expensive, nevertheless, if you go without some features the free versions also available.

#2 NetBeans IDE
NetBeans comes with an IDE GPL license and is free. It runs on any computer as long as it is a JAVA virtual machine, making it easy to run on OSs like Windows, Mac OS and *nix as well. The only fall is it runs very slow so it can cost you your time.

#3 Eclipse
Eclipse Che comes with its own pre-built stack basically for Android including Gradle and JDK. The downfalls are you cannot watch a live preview and being a cloud IDE, it does not do much on a desktop.

You May also Like :

