Fix Windows 10 Slow Internet : The Windows 10 Anniversary Update comes with new improvements. But some issues also come along with it. Slow Internet is the major issue in Windows 10 Update.
It takes lots of time to load a single page so that there are some methods to fix Windows 10 Slow Internet issue that are mentioned below :
6 Methods to Fix Windows 10 Slow Internet :
#Method 1 – Close the Peer to Peer Update Process on Your PC
Sometimes,your window system shares your internet bandwidth with your peers without getting your permission.
So you must shut down the peer to peer update process on your PC. You close the channel from where you download applications and system updates from other PC’s connected to the server.
It includes following steps:
- Step 1: Click “Start” menu and then type “Settings” to open it.
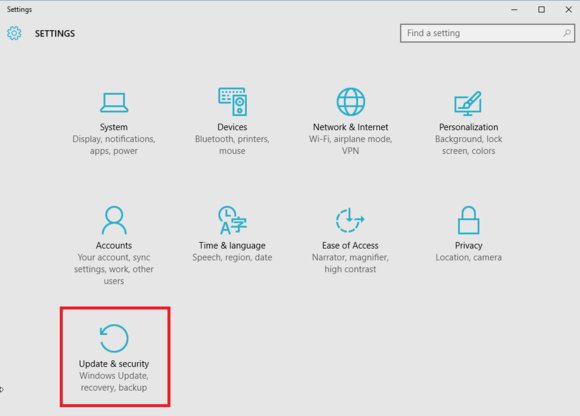
- Step 2: After this, select “Update and Security” option from it.
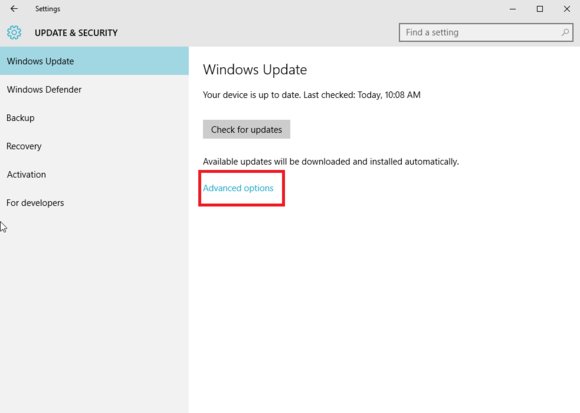
- Step 3: Now click on “Advanced Options”.
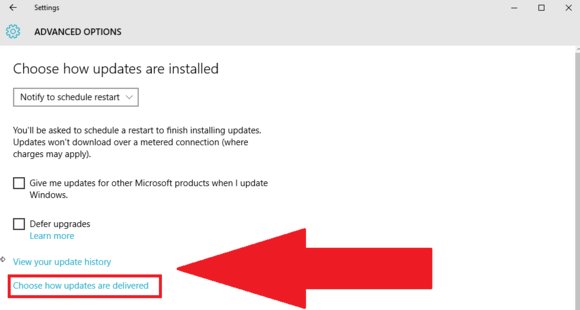
- Step 4: After clicking on it, then you click on “Choose How Updates are delivered”.
- Step 5: Then go ahead and turn off the “On” button.
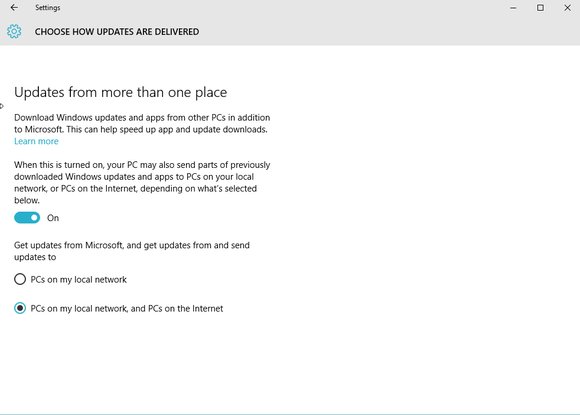
Through these all steps, you can increase the speed of your internet.
#Method 2 – Disable Windows Auto-Tuning Feature
By default, window Auto- tuning is enabled which improves the performance for programs by receiving TCP data over a network.
So when the window “Auto-Tuning” feature is ON it hits the speed of the internet. So you can disable this feature in order to fix Windows 10 Slow Internet.
It has following steps:
- Step 1: Press “Win + X” buttons and select “Command Prompt”.
- Step 2: Then type the command “netsh interface tcp show global” in the window of command prompt.
- Step 3: Then check for “Receive Window Auto-Tuning Level” and if it is “normal” then you will need to disable it.
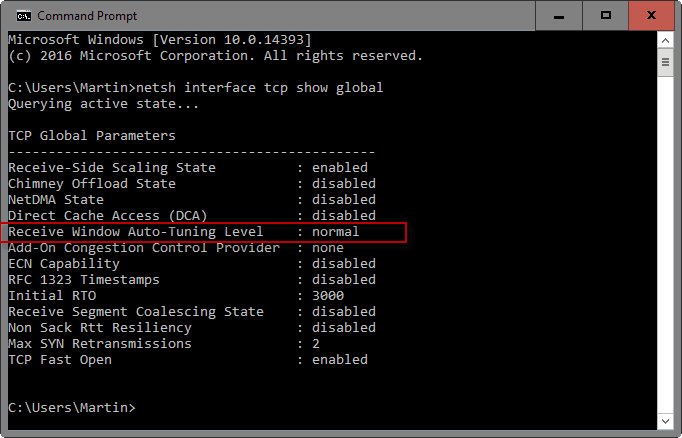
- Step 4: After this, type the command “nets hint tcp set global autotunninglevel = disabled” to disable it.
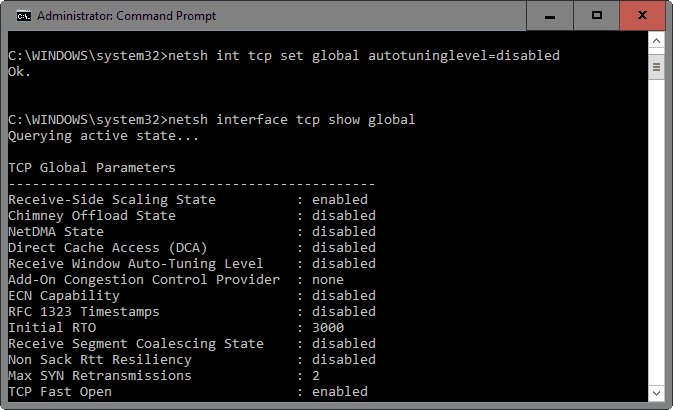
Now, you can test the speed of the internet after those adjustments. if there are no changes in the internet speed then you can again enable the Window “Auto-Tuning” feature by typing the command “nets hint tcp set global autotunninglevel=normal” in the command prompt.This with helps to fix Windows 10 Slow Internet.
#Method 3 – Update Your Network Drivers
When Windows upgrade to new Windows OS then some driver errors occur. Missing or Incorrect network drivers may result in limiting internet speed. So you need to update the network drivers through Driver Talent. It follows some steps that are following: –
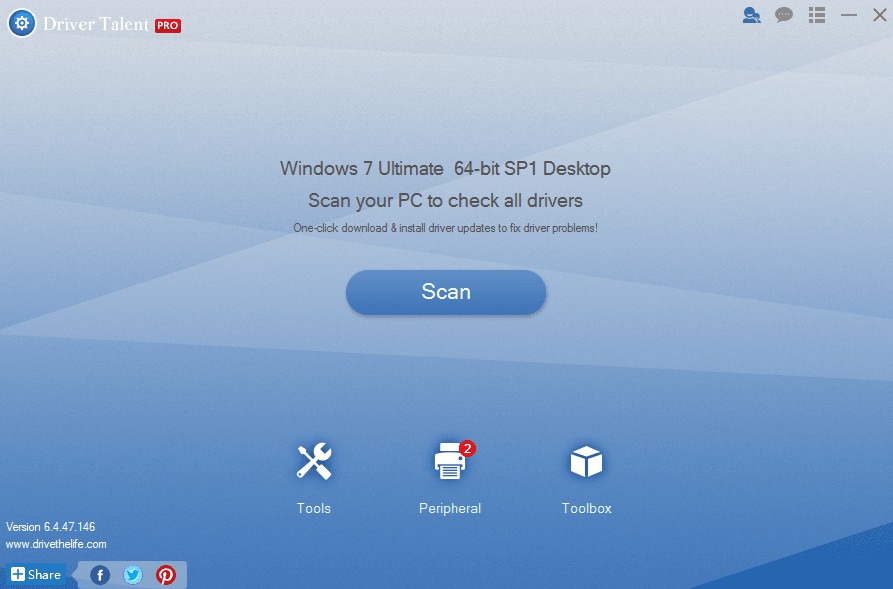
- Step 1: Launch “Driver Talent”. Then open “Driver Talent” and then click “Scan” to identify all the incorrect drivers on Windows 10 Anniversary Update.
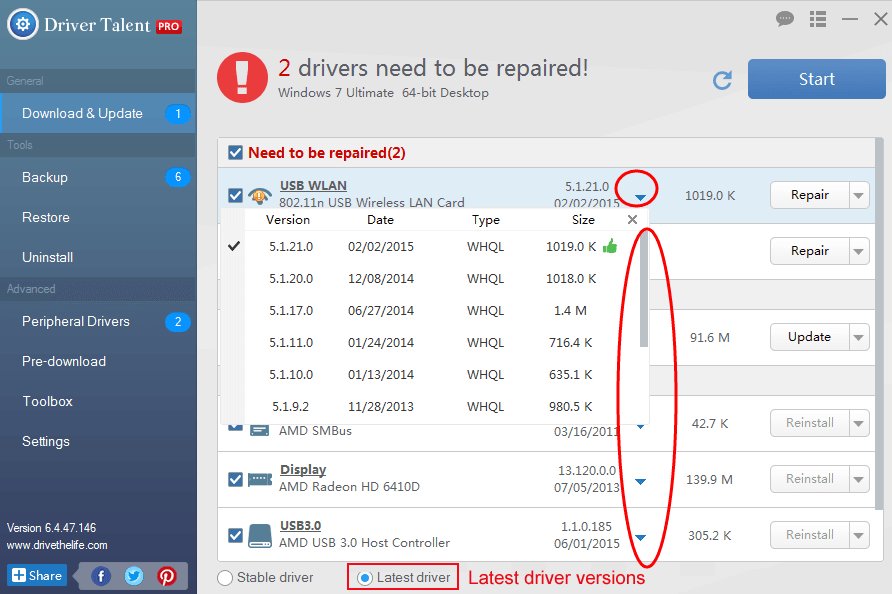
- Step 2: After scanning, all the faulty drivers will be listed. Then click on “Repair” to fix those drivers or you can also update the drivers by clicking on “Update”.
- Step 3: After this, restart your System to make the changes permanently.
#Method 4 – Disable Large Send Offload (LSO)
LSO forces your background apps to use the maximum internet like Skype. So you can disable this option to improve the internet speed. It contains some steps that are discussed below: –
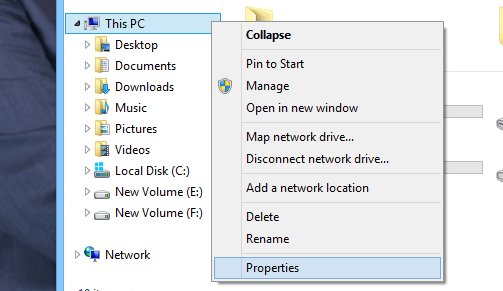
- Step 1: Open “Start” and then right-click on your “Computer”.
- Step 2: Then Select “Properties” from the pop-up menu.
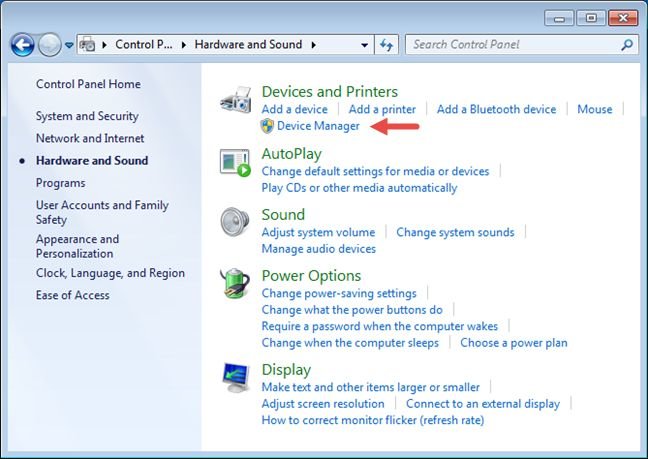
- Step 3: After this, click on “Device Manager” from your “Control Panel”.
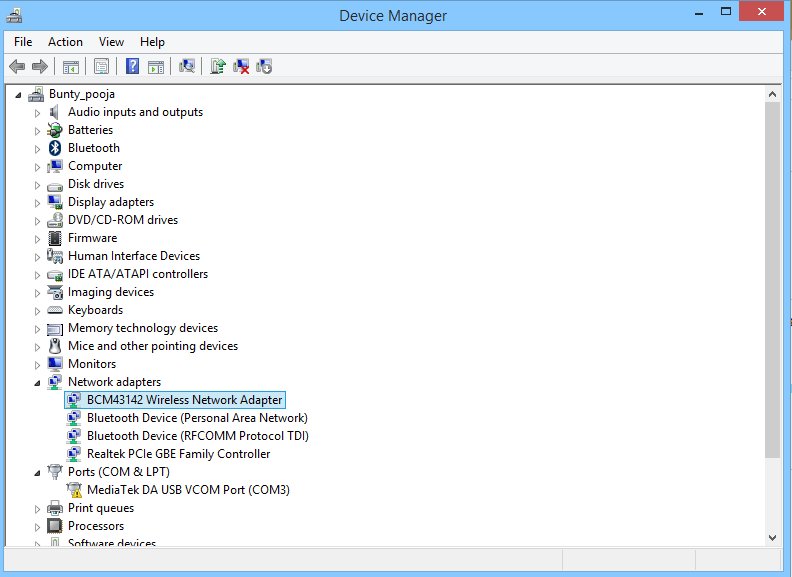
- Step 4: in this, expand the option of “Network Adapters”.
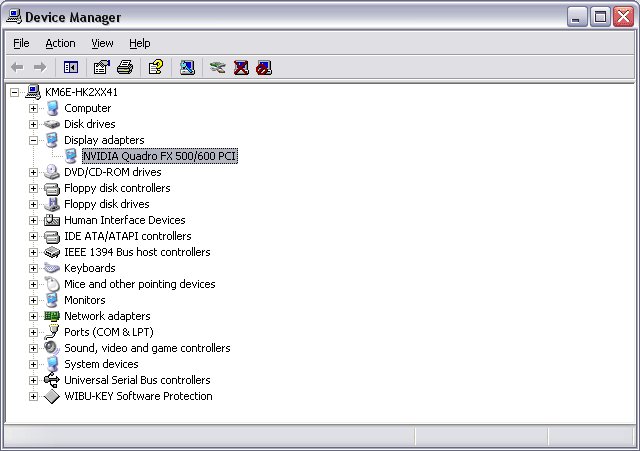
- Step 5: Now, you see your “Network Card” and then double click on it.
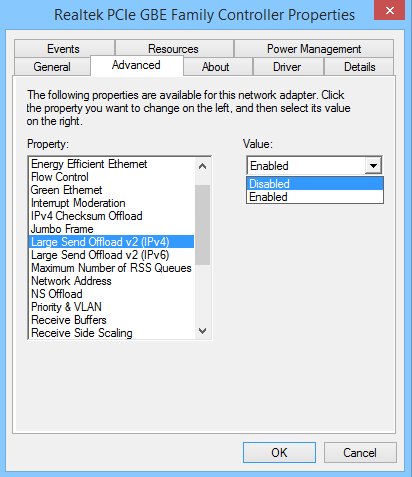
- Step 6: A new window will be opened. Then you click on “Advanced” tab and select the option of “Large Send Offload V2”. After this, set the value “Disabled” and click “OK”.
#Method 5 – Adjust the Internet Bandwidth Settings
There are some steps to fix Slow Internet in Windows 10 which follow as :
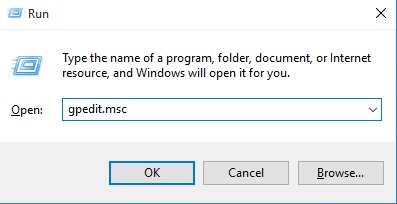
- Step 1: Press the key “Win + R”.
- Step 2: Type “msc” in the search box and then press “OK”.
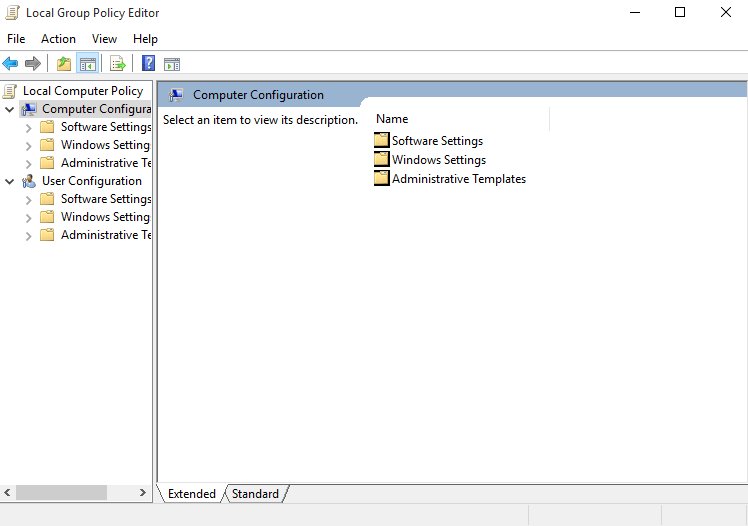
- Step 3: Then a new window “Group Policy” will open and then click on “Computer Configuration” option.
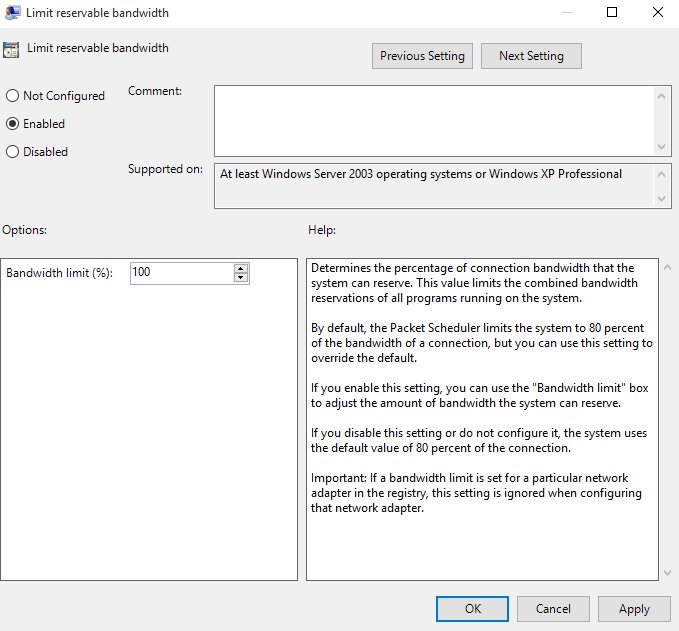
- Step 4: Then next go to “Administrative Templates”, then select “Network”. After this select “QoS Packet Scheduler” and click on “Limit Reservable Bandwidth”.
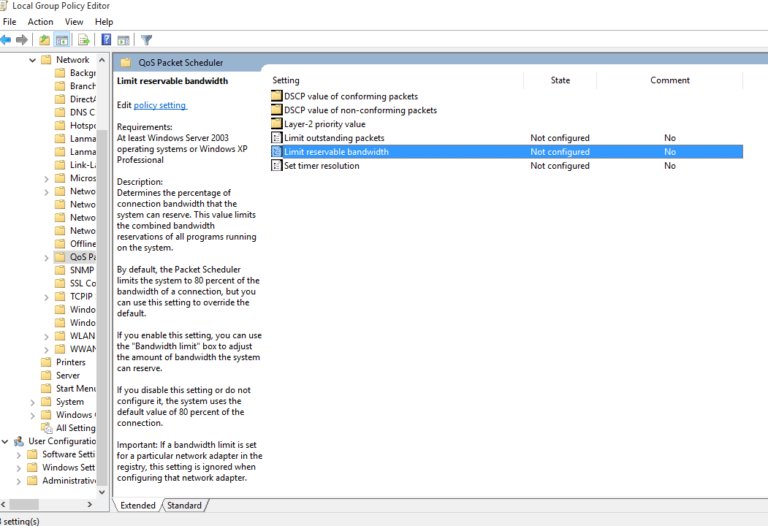
- Step 5: Now new window pop-up. First, choose “Enabled” then change the “Bandwidth Limit” from 100 to 0. Then click on “OK”.
#Method 6 – Quit Your Background Apps
There are some background apps which consumes a large amount of the internet such as:
- Torrent Applications
- Antivirus Software
- Steam
- Cloud storage applications
- Graphics card driver applications
So there is need to quit these apps which consist various steps that follow as: –
- Step 1: Right-click on the “Window Taskbar”. Open “Task Manager”.
- Step 2: Then click on the “Performance” tab in the Task Manager’s menu.

- Step 3: Now click on “Open Resource Monitor” from the bottom part of the window.

- Step 4: Finally, click on the “Network” tab and check for all your apps which have a high number of send and receive requests.

- Step 5: To quit apps, click on “Start” and then select your “Settings”.
- Step 6: Next click on “Privacy” then “Background apps”. So you turn off the apps which consume more internet.

Read Also :

No Responses