Post-processing is one of the primary prerequisites of filming with any kind of shooting device; however, we can see that some cutting edge shooting devices comprise of built-in post-processing devices, although they have a plethora of limitations and they typically come with dedicated cameras only.
In today’s article, we are about to disclose brilliant post-processing software for any DJI drone video editing without much hassle. Often, we face many issues related to post-processing of DJI videos: people are getting laggy videos after rendering, too much of noise, sometimes we could not finish the rendering, and so on.
These issues are not easy to skim when we face, thereby a lot of third party post-processing software developers introduced various applications; today, we will get to know one of the best solutions among many alike, VideoProc.
As a cinematographer or video editor, we always fancy seamless, accurate, and less ambiguous video edition solutions for some obvious reasons. Thus, we can consider VideoProc, because it is one of the fastest and seamless software for processing and editing any DJI raw videos within a blink of the eyes; it is further capable of rendering videos up to 2.7K or even a massive 4K video.

After installation when you first time opens up the interface of this app; you get amazed because of the simplicity of the interface and all the processing, rendering or the video editing is so seamless that you won’t be able to detect any inconvenience even while you load any large video file on VideoProc.
For example, you can simply drag a huge 4k file on that application to stabilize any destabilized footage of any DJI device. Furthermore, the rendering is unparalleled, because it could compress any length of the video up to 90% of its original size, and the full GPU acceleration of this application generally consumes only 40% of the CPU.
You can use this application to edit or render any videos including large-sized DJI drone videos within a short while; however, this application could be a DJI video editing software, and using the software one can do: cut, crop, stabilize, denoise, speed moderation, resizing or even format conversion of any file within a very short while.
Although, to do so, we have to install and learn some basics of this application first. To download, you can visit the official website and from there, you will easily get the setup file. After installation on your desktop platform, you can do the following operations very easily.
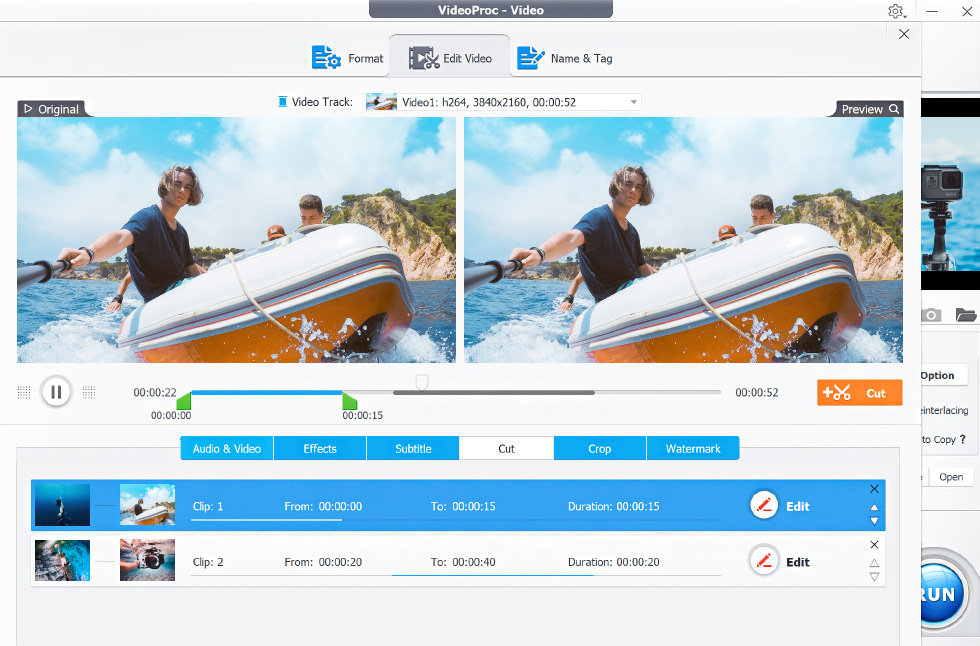
Cut: Regardless of the format of file and size, you can easily cut any of your DJI drone videos using this application interface just with some easy steps:
1. Open the application and then press the option called ‘Video’
2. Now you will be able to notice an option called ‘Video’ again with a plus sign, on the top header of this application; press that button.
3. Aftermath, a separate window will appear for the selection of the video file. Select the desired one and press ‘Open’. Otherwise, you can also drag and drop the video file.
4. Now you will get to see several options like effect, watermark, cut, crop, etc on the bottom of the video option bar. Press the ‘Cut’ option from there.
5. Now drag the time bar and adjust as per your requirement.
6. Finally, press the ‘Cut’ option, and from there, you have to press ‘Done’ to finalize your selection.
7. Now from the ‘Target format’ section, select the desired format and press the ‘Run’ button.

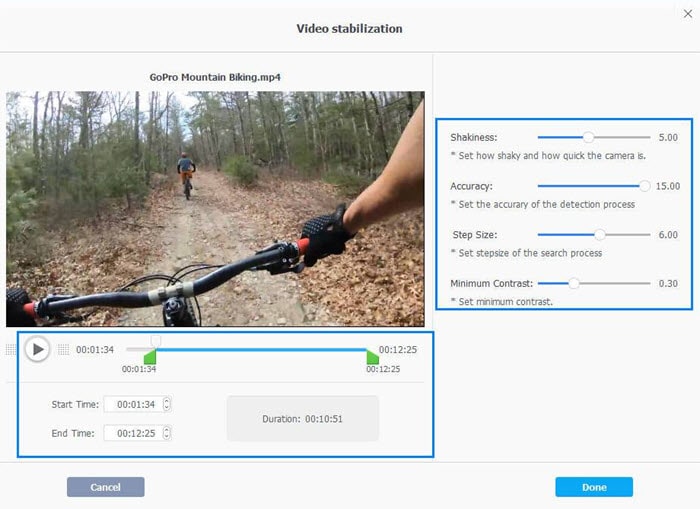
Deshake: If you have any shaky video and you want to stabilize with this application then without ado follow all the mentioned steps beneath:
1. Follow the three aforementioned initial steps from the ‘Cut processes and then go the ‘Tool Box’ at the bottom of the interface.
2. From there, double-click on the option called ‘Deshake’ from there.

3. Now on the ‘Deshake’ interface, you will have four parameters; adjust as per the shakiness of your video and press ‘Done’ from there.
4. Additionally, you can enable the ‘Hardware Acceleration Engine’ for faster processing.
5. You can also choose the destination folder of the output file by clicking on the ‘Browse’ option from the ‘Output folder’ panel.
6. Finally, press ‘Run’; this entire exporting and rendering could take some while.

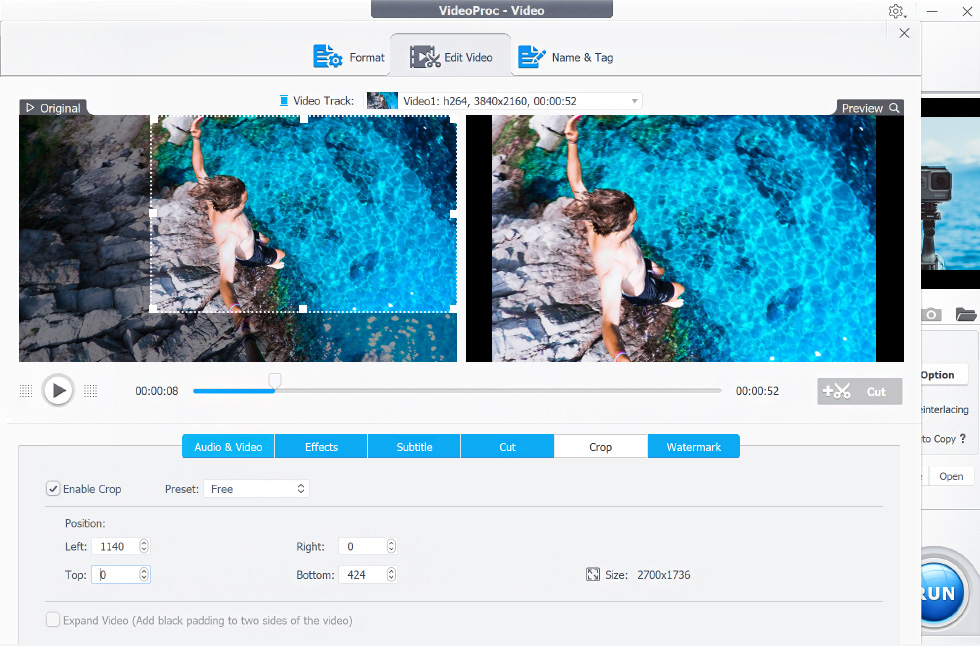
Cropping: This simple but very useful function is one of the most commonly used features of all time. However, if you are not a professional videographer or editor, you could always need this feature. To resize or crop any video, you just follow these steps.
1. Again, you have to follow those three common steps at the commencement of this process.
2. Now under the video, you will see options like effect, watermark, cut, crop, etc. and from there, you have to click on the ‘Crop’ option.
3. Now, check the ‘Enable crop’ option.
4. Then, drag the crop window as per the frame demand; you can review a glimpse of the final video frame on the right hand.
5. Now select the ‘Done’ option. And there you go.
To understand the real essence of the GPU acceleration technology, you have to understand first the basics of 4K technology a bit. We experience an eye-catchy, vibrant, and seamless visual experience when we observe any 4K video or image, and it happens only because of the extra pixels of any 4K file. Thereby, to process or render this extra we need well-forged hardware, and that would cost a huge amount to the consumers; so, this Hardware Acceleration technology helps this application to run smoothly even if you do not pursue professional-grade hardware in your desktop computer.

Conclusion:
Luckily, Apple and Windows, VideoProc is available for both the prevailing platforms; however, some basic processes might be a little different. Both the prevailing operating systems have many supported pro-grade video solutions; however, VideoProc is recommended over many famous alternatives to this because this application is suitable for any users, and it is much faster and user-friendly than many popular other editors.

No Responses