Wi-Fi Hotspot facility is a virtual router schema which allows you to share or connect internet connection with other wireless devices.
It is also known as wireless internet connection. It is the mechanics that allow you to connect multiple devices at the same time.
There are many types of software of making the laptop as a Wi-Fi Hotspot which that are discussed below
#1. Connectify Hotspot
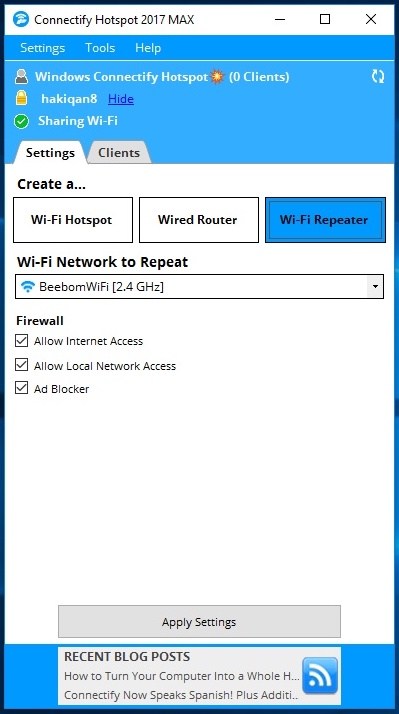
Connectify Hotspot is a program which is used to share your internet connection from your PC, laptop or tablet with your any device like a game console, media player, other laptops, Smartphone and many more. With the help of Connectify Hotspot, you can be connected anytime and anywhere.
Features of Connectify Hotspot
- It is easy and simple to use.
- The interface of this software is nice and user-friendly.
- It contains various options.
- It is reliable app which coverts your system into Wi-Fi Hotspot
- If you are using the free version of this app then after 30 minutes, it automatically disconnects the connection.
- It supports both wired and wireless connection.
There are many steps to set up Connectify Hotspot in your system that are following: –
Step 1
Firstly, you will download the latest version of Connectify Hotspot on your computer system. Then after downloading, you will run and install this software on your system. After installation, reboot your system.
Download and install the latest version of Connectify Hotspot on your PC or laptop.
Step 2
After rebooting, check the internet connection whether it is connected or not. Then, open this software on your system and then press the “Settings” Now, create a WI-Fi Hotspot so select it. Then, click on “Internet to Share” and it shows drop-down list and chooses appropriate connection which you want to share.

Step 3
Now, you will add Hotspot Name (SSID) in the Hotspot Name text field and Password in the password text field. The latest version of Connectify Hotspot 2017 allows you to use Special Characters and Emojis in the hotspot name.

Step 4
Now, click on the “Start Hotspot” button that enables you to share your internet connection with your any device, family or friends.

Step 5
You will keep one thing in your mind, you have to select ad Blocker option that saves your money and battery life & bandwidth of your system.

Step 6
Finally, you are able to connect any devices to your hotspot.
#2. mHotspot
You can download this software without paying any cost. You are able to turn your window system into virtual Wi-Fi Hotspot with the help of this app. It allows you to contribute your internet connection with any device like Smartphone, tablet, another laptop system, and so on.
Features of mHotspot
- 10 devices can be connected in a single internet connection by mHotspot.
- It has simple settings so that anyone can operate this software by adding some basic settings.
- It gives the facility to set up hotspot name as your name without containing any restrictions.
- It is compatible with all types of devices.
- It is easily accessible by anyone and any device
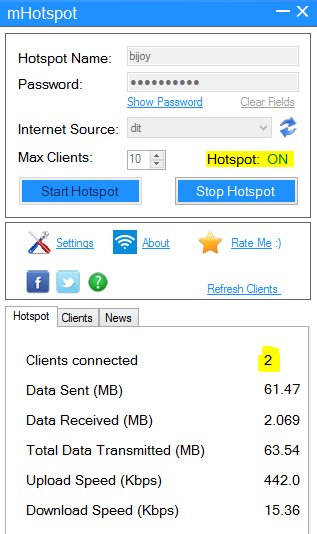
- You can check the network usage in it such as data transfer rates, uploading, download speed etc.
- It works on Window 7, Window 8 and Window 10.
- You can use any type of connection like Ethernet, LAN, Wifi, 3G/4G etc
- You can also review the information of connected devices that are an IP address, Name, Mac address, etc.
- You can also extend the Wi-Fi range and it behaves like as a repeater.
- You can make a secure connection by providing password security of WPA2 PSK.
It includes various steps that are mentioned below: –
Step 1
Firstly, you will download the latest version of mHotspot on your computer system. Then after downloading, you will run and install this software on your system. After installation, reboot your system. You can download from the following link this software.
Step 2
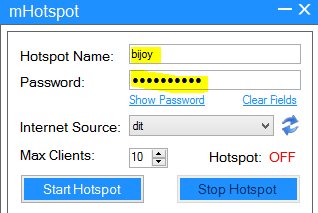
After rebooting, you will add Hotspot Name in the Hotspot Name text field according to your choice. You can choose your name as a Hotspot Name. Then, you will enter Password in the password text field and it must contain minimum 8 characters.

Step 3
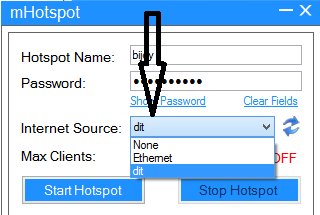
Now, you will click on the “Internet Source” drop-down list and choose your active internet connection from the list. After this, you can access the internet connection

Step 4
In this, choose maximum numbers of devices that you want to connect to the hotspot.
![]()
Step 5
Now, click on “Start Hotspot” to start your Wi-Fi Hotspot connection from your system.

Final words
Setting up a mobile wifi hotspot on your Windows PC can be a bit of a hassle, or it can be pretty easy. It just depends on what version of Windows you’re running and whether you’re willing to use a third-party app. But the next time you’re stuck somewhere with only a wired Internet connection, at least you know you can use your PC to share that connection with your other wireless devices.

No Responses